Most traders lose money. Not because they pick bad stocks or trade the wrong indicators. They lose because they risk too much on a single trade and one bad day wipes out weeks of gains.
Position sizing is how you control that. It is the difference between a losing trade and a blown account.
This article explains exactly how to calculate your position size before every trade, using a real example from SPY with real numbers.
Why Traders Blow Up
The pattern is always the same. A trader has a few good trades, builds some confidence, and then starts sizing up. They go heavier on a trade because it looks perfect. The trade goes against them. Instead of cutting the loss, they hold because they are too deep in to take the pain. The account takes a hit they cannot recover from.
It is not a strategy problem. It is a sizing problem.
When you risk a fixed, defined percentage of your account on every trade, no single loss can destroy you. You stay in the game long enough for your edge to play out.
The Formula
Before you enter any trade, you need three numbers:
- Your account size
- How much you are willing to risk on this trade (as a percentage)
- Your entry price and stop loss price
From those three numbers, everything else is calculated for you.
Step 1: Max dollar risk
Account size times risk percentage equals max dollar risk per trade
Step 2: Risk per share
Entry price minus stop loss price equals risk per share
Step 3: Shares to buy
Max dollar risk divided by risk per share equals number of shares
That is the whole formula. Once you know those three steps, you never have to guess how many shares to buy again.
A Real Example: SPY Trade
Here is a real trade setup on SPY, 4 hour chart.
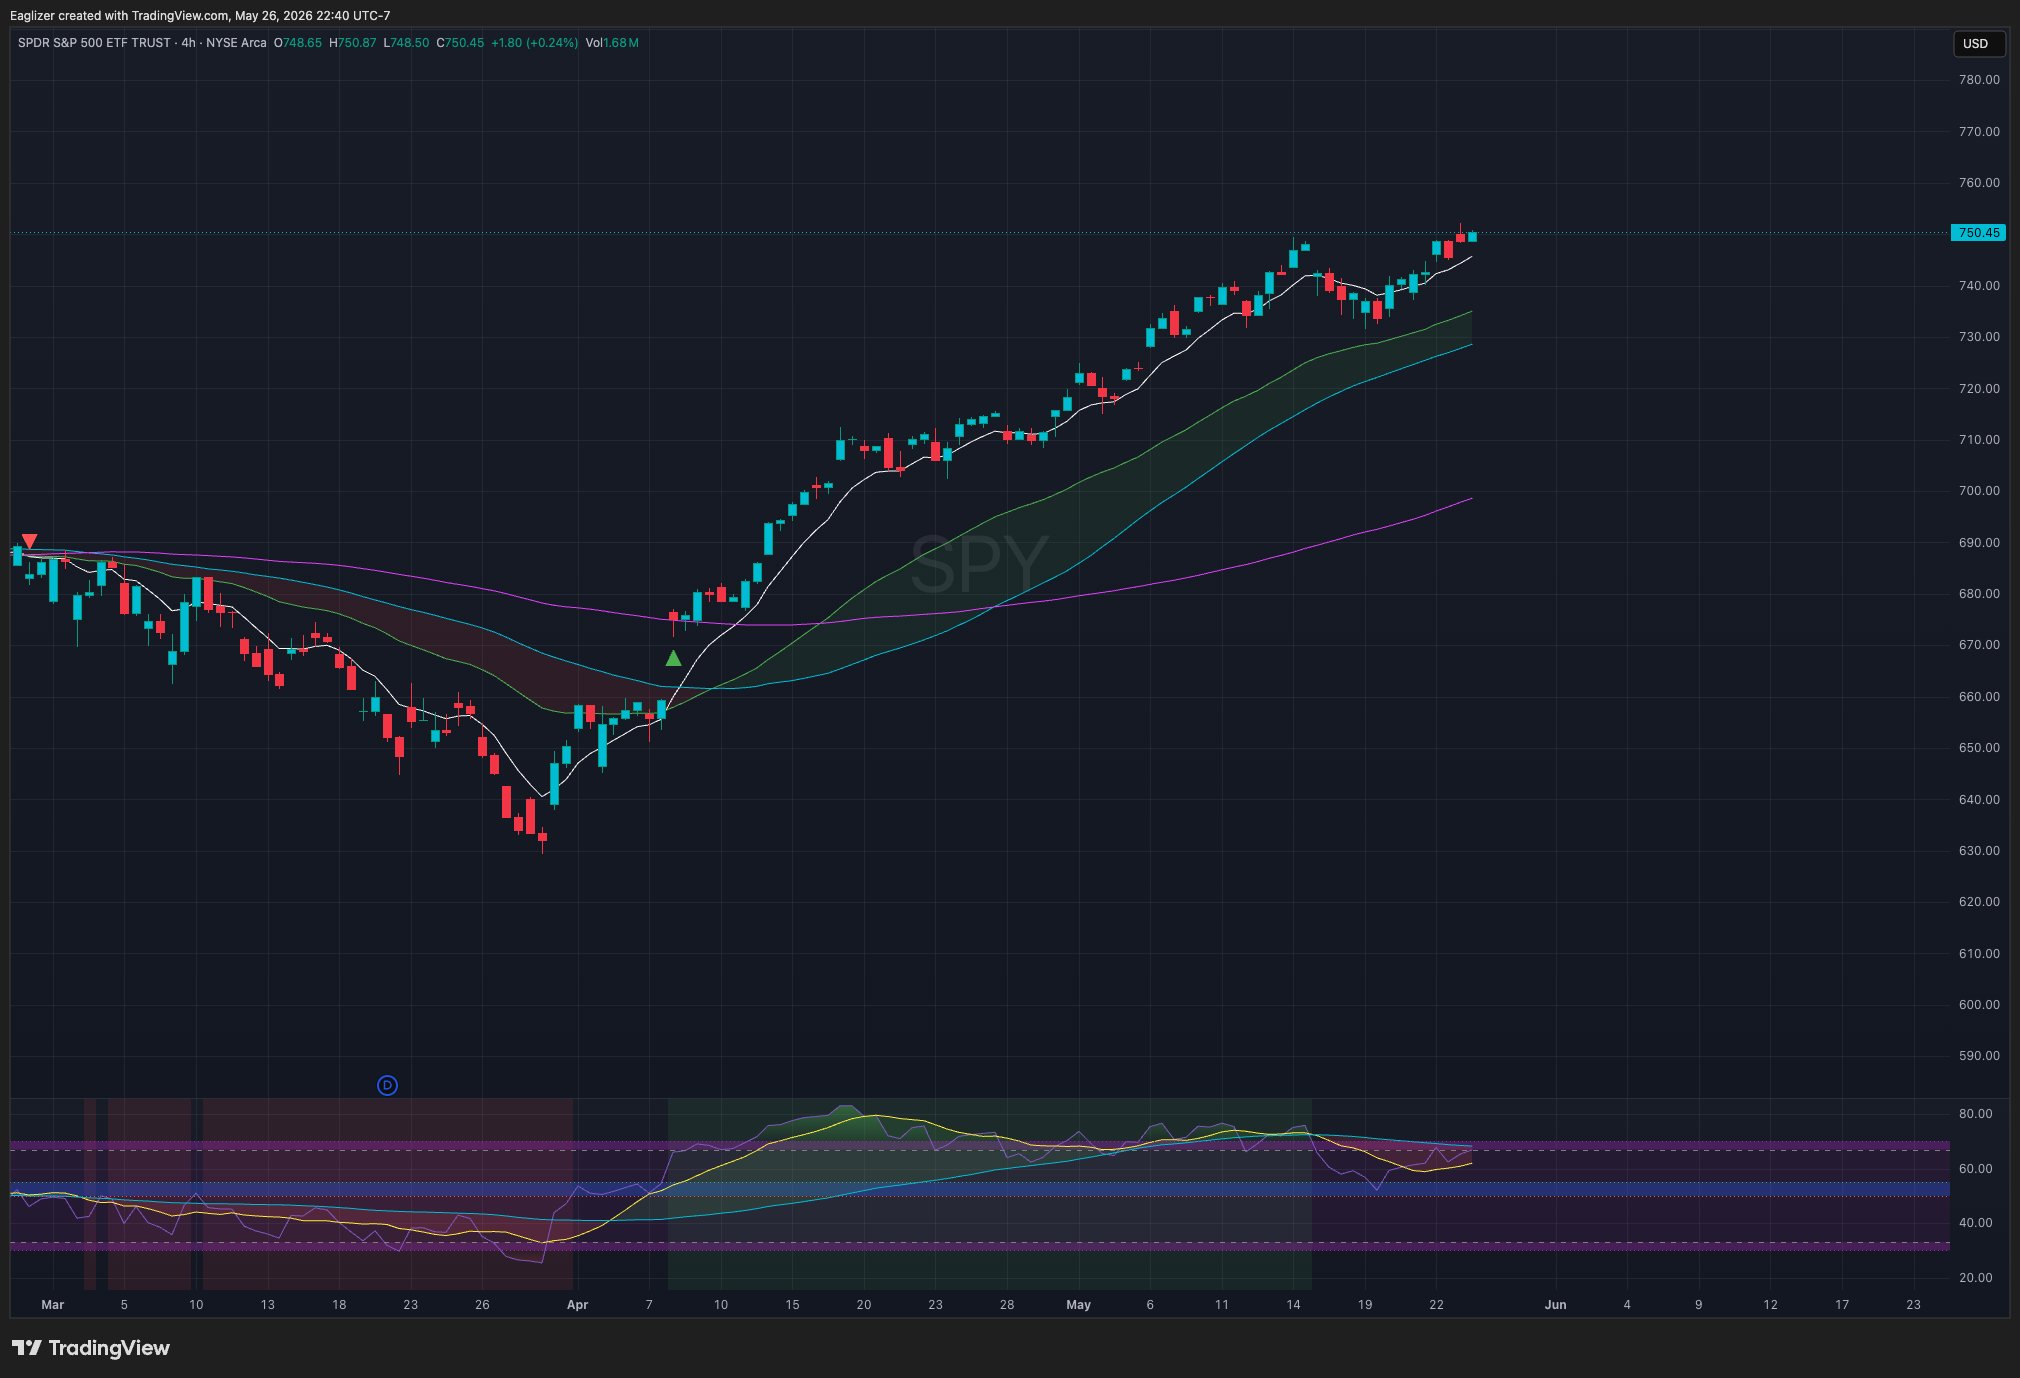
The chart shows SPY coming off a significant downtrend and recovering. The EMA stack is turning bullish, price is holding above the EMAs, and the structure supports a long entry.
Here is the zoomed in view showing the exact entry and stop levels.
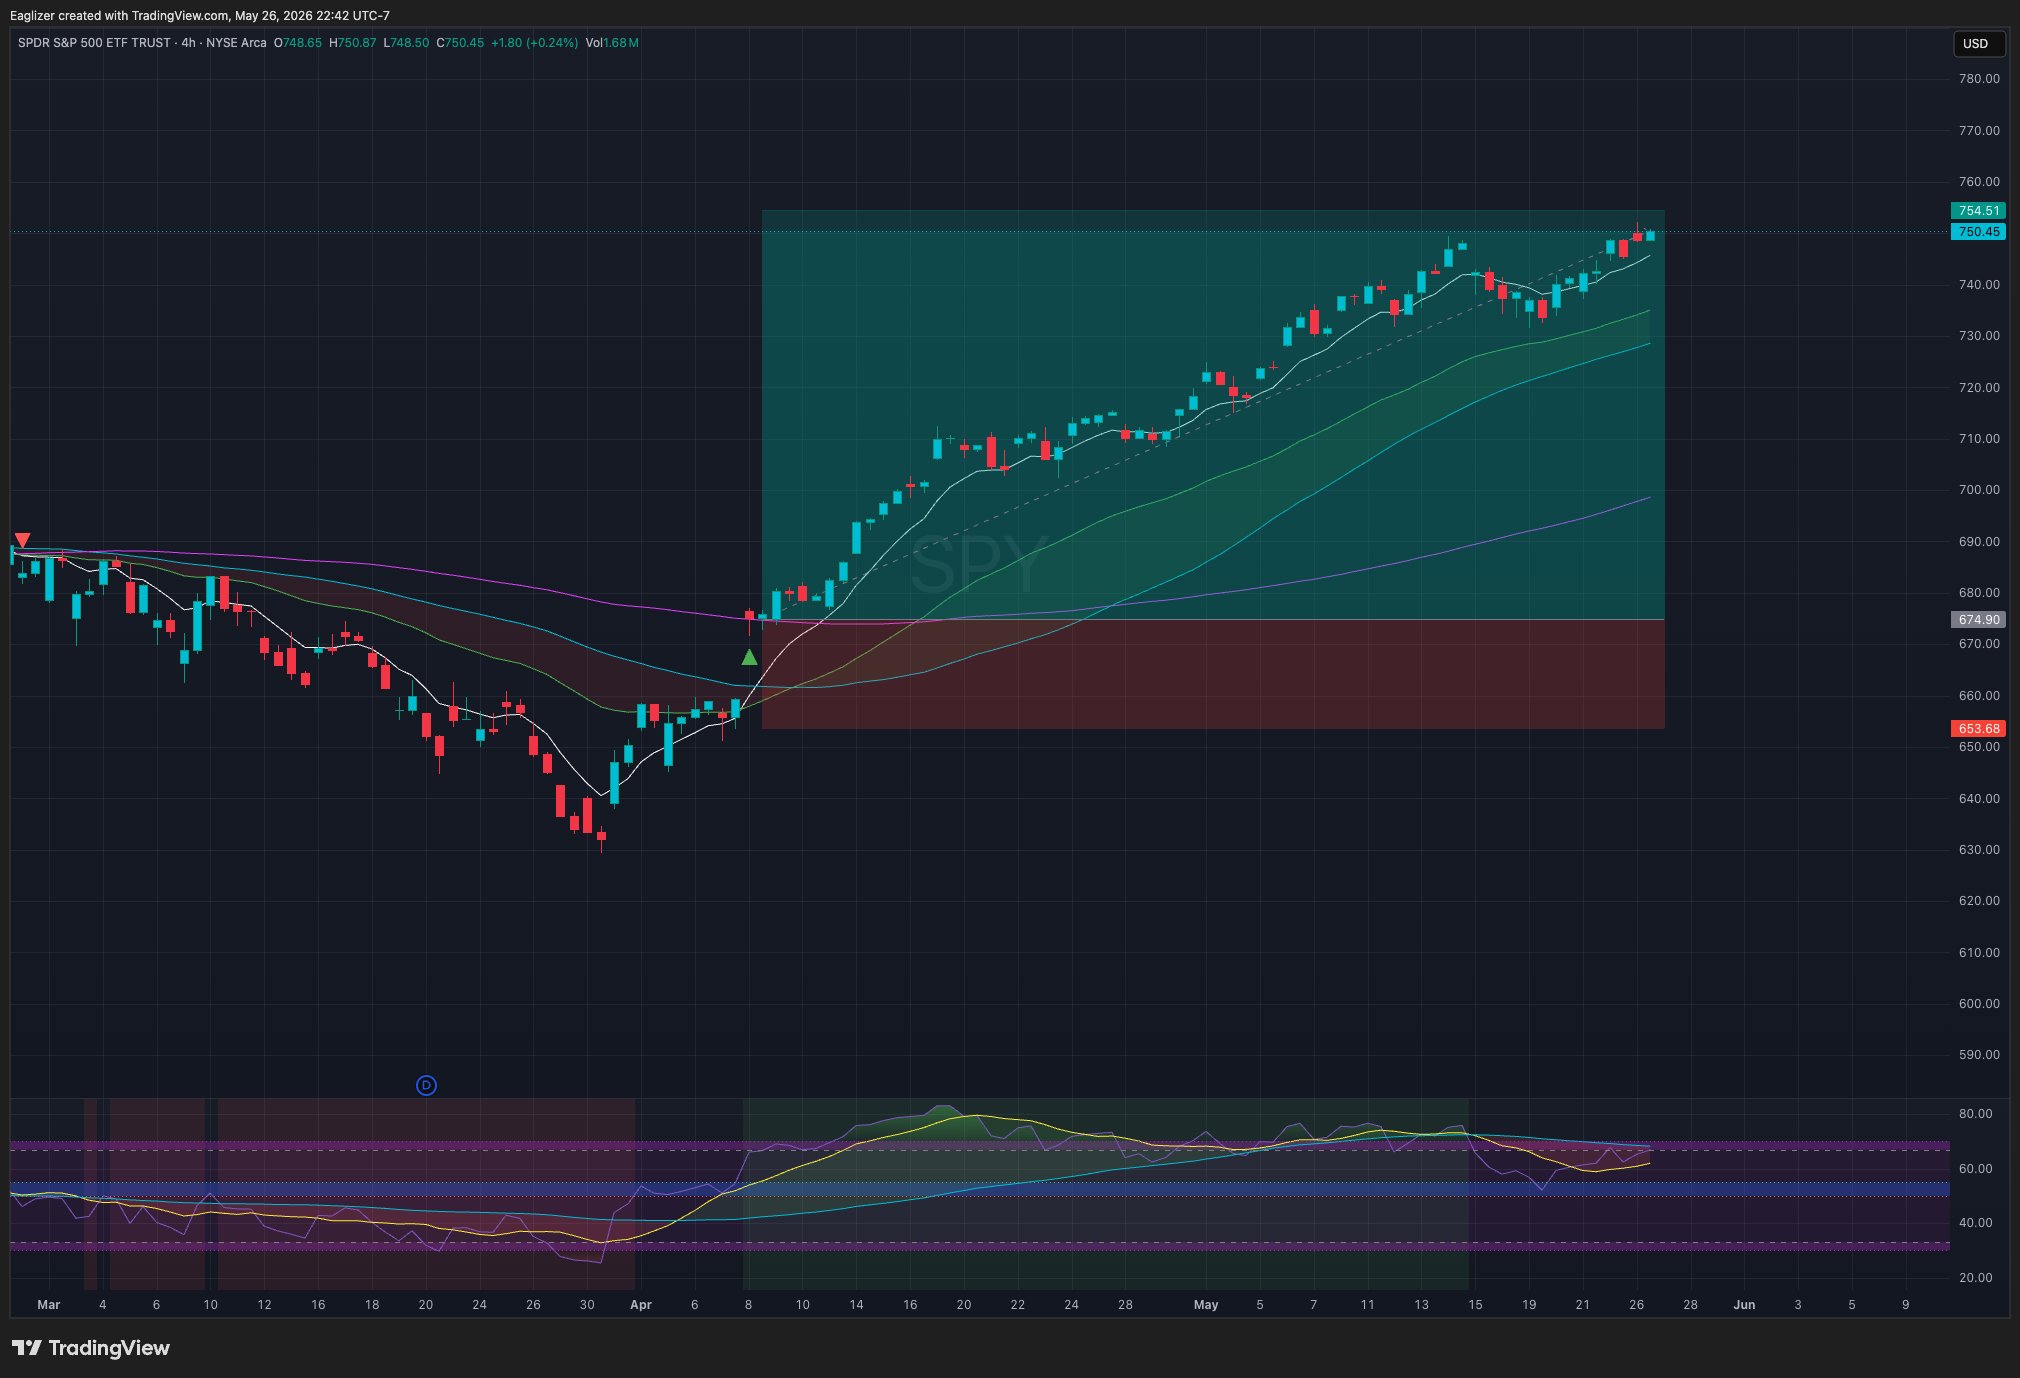
- Entry: $674.90, price reclaiming above the EMA stack after the trend shift
- Stop loss: $653.68, below the swing low, below structure
- Target: $750.45, next major resistance level
Now plug those numbers into the formula.
Account size: $10,000
Risk per trade: 3%
Max dollar risk: $10,000 x 0.03 = $300
Risk per share: $674.90 minus $653.68 equals $21.22
Shares to buy: $300 divided by $21.22 equals 14 shares
Here is exactly what that looks like in the Position Size and Risk Calculator from the Eaglizer Trading Starter Pack.
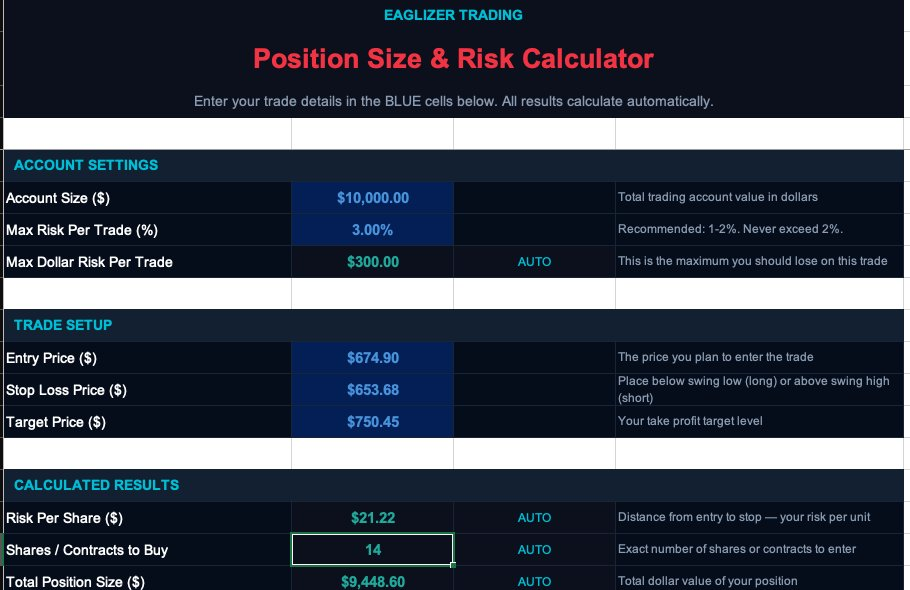
The calculator confirms 14 shares. Total position size is $9,448.60. If the stop gets hit, you lose $297.08, right at your 3% max risk. If the target gets hit, you make $1,057.70. That is a 3.56x risk to reward ratio.
How Much Should You Risk Per Trade?
There is no single right answer. It depends on your account size, your strategy, and how aggressive you want to be.
Here is a general framework:
- Conservative (1 to 2 percent): Slower growth, very resilient to drawdowns. A string of 10 losing trades still leaves your account largely intact.
- Moderate (3%): A balanced approach. You can grow meaningfully but losses are controlled. This is what the example above uses.
- Aggressive (4 to 5 percent): Higher upside, higher drawdown risk. Only appropriate if your strategy has a proven edge and you have the discipline to follow your rules without exception.
The important thing is that you pick a number and stick to it. Varying your risk based on how confident you feel is how traders blow up. Confidence is not a sizing metric.
What Happens Without Position Sizing
Say you skip the formula and just buy 50 shares of SPY because it seems like a good trade.
At 50 shares, your risk per share is still $21.22. Your total risk is $1,061. That is 10.6% of a $10,000 account on a single trade.
One stop out and you are down over 10%. You need an 11.8% gain just to get back to where you started. That is not trading. That is gambling.
The math does not care how good the setup looks. Size correctly every time.
The Stop Loss Is Not Optional
Position sizing only works if you actually exit at your stop. If you move your stop because the trade is going against you, the formula is meaningless.
Your stop loss is part of the trade before you enter. It is the price that tells you the setup is wrong. When price hits it, the setup is wrong. Get out.
The number of shares you buy is calculated based on that stop. Move the stop and you have broken the entire system.
The Bottom Line
Position sizing is not exciting. It does not find you better entries or help you pick winning stocks. What it does is keep you alive long enough to let your edge work.
Every trade gets the same formula. Same discipline. Same max risk. No exceptions.
The traders who blow up are not always wrong about direction. They are wrong about size.
Next Step
Ready to trade with precision?
Start with the free Eaglizer RSI Cloud on TradingView, then get Eaglizer Precision for the full system with pivot boxes, EMA trend filters, and defined stop and target rules, including the exact position sizing math from this article.


Leave a Reply